




Home / Product knowledge / Cold Room Floors: Frost Heave, Insulation and Heating
Cold Room Floors: Frost Heave, Insulation and Heating for Freezer Rooms
Most cold room failures that show up years after handover do not start in the walls. They start under the slab. A cold room floor on a freezer running at −18 °C or colder pulls heat out of the ground beneath it every hour of every day. Once the subsoil drops below zero, the water in it freezes, expands and lifts the slab. That is frost heave — and by the time you see a crack at the door threshold, the fix is usually a full floor removal. This guide covers when heave is a risk, the three ways to stop it, how thick the floor insulation needs to be for each temperature band, and the build-up sequence that keeps a cold room floor flat for the life of the building.
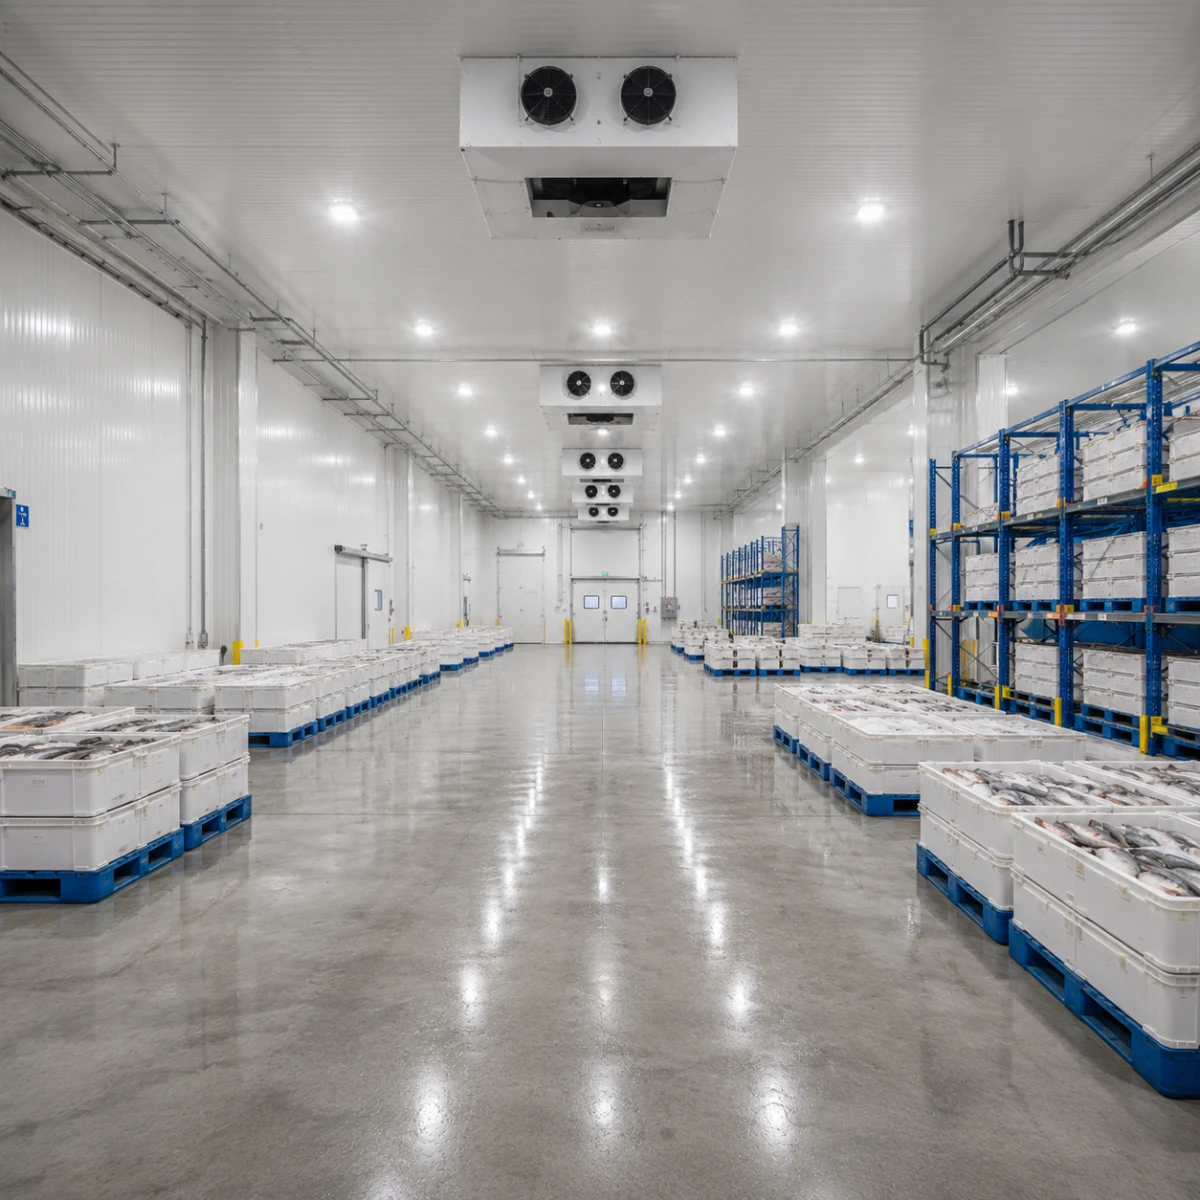
When a cold room floor is at risk of frost heave
Chillers are usually safe. A room held at 0 to +5 °C loses some heat through the floor, but the ground under it stays above freezing, so nothing expands. The problem begins below zero, and it gets worse fast as the temperature drops:
- −18 °C (standard freezer): heave is a real risk on any slab poured directly on natural ground. Protection is mandatory.
- −25 to −30 °C (blast and deep freeze): the frozen zone under the slab grows deeper each season. Heating or ventilation is required, not optional.
- −40 °C and below (ultra-low): the floor is the single largest heat-loss path in the room. Thick insulation plus active heating, no exceptions.
Two site conditions make it worse. A high water table — common along the coasts of Latin America, West Africa and the Gulf — means more water in the soil to freeze. And fine-grained soils (silt, clay) hold water and form ice lenses far more readily than sand or gravel. If your site has either, treat the cold room floor as a structural problem, not an insulation afterthought. Our guide to cold storage in hot climates covers why tropical sites are not immune just because the air is warm.
What frost heave actually does to a building
Frost heave is not gradual settlement. It is upward pressure — often several centimetres over a few seasons — and it is rarely uniform, so the slab tilts and cracks. The visible symptoms usually arrive in this order:
- The sliding door no longer seals at the bottom; ice builds on the threshold.
- Pallet racking goes out of plumb; forklifts start clipping uprights.
- A crack opens across the wear slab, typically near the perimeter or at a column.
- The floor panel joints separate and warm, moist air is drawn in from below.
At stage four the insulation is wet and has lost most of its R-value, the refrigeration plant is running longer to hold temperature, and the only real repair is to strip the floor and rebuild it. That is why the cold room floor is the one part of the build where getting it right first time is worth more than any later upgrade. Frost heaving is well documented as a soil mechanics phenomenon; what is often missed is that a freezer creates permafrost conditions under a slab regardless of the climate outside.
Three ways to protect a cold room floor
All three work on the same principle: keep the ground under the slab above 0 °C so there is nothing to freeze. They differ in cost, energy use and how well they suit a given site.
1. Ventilated sub-floor (passive or forced)
A grid of ducts or a void is built under the base slab, open to outside air at both ends. Ambient air moves through, replacing the heat the freezer extracts. In hot climates this is the most attractive option: the outside air is already warm, so a passive system with open vents often does the job with no running cost. In cooler regions or for ultra-low rooms, small fans force the airflow. The trade-off is depth — the ducts add 200 to 300 mm to the excavation — and vents must be kept clear of debris and standing water.
2. Electric heating cables or mats
Resistive heating cable is laid in the sand bed or cast into the base slab below the insulation, controlled by a thermostat sensing the soil temperature and set to hold around +3 to +5 °C. This is the simplest to install, works on any site regardless of ground conditions, and is the usual choice for small and medium freezers. The cost is continuous electrical draw — modest, but it never switches off for the life of the room — and the cable cannot be repaired without lifting the floor, so cable quality and a duplicate circuit are worth paying for.
3. Glycol heating loop
A closed loop of pipe under the base slab circulates warm glycol, usually taking waste heat from the condenser side of the refrigeration plant. It uses heat that would otherwise be rejected to the air, so the running cost is close to zero once installed. It is the standard on large industrial freezers and cold stores where the plant is already sized to provide it. On small rooms the pumps and controls rarely justify themselves.
The fourth option: get the floor off the ground
Raised floors and container cold rooms sidestep heave entirely. A container-based freezer sits on its chassis with an air gap underneath, which is one reason it suits remote and off-grid sites. Modular walk-in rooms built on an existing warm slab (inside a warehouse, for example) also avoid the problem, because the host building keeps the ground above zero. This is one of the practical differences we cover in walk-in cold room vs built cold store.
Floor insulation: thickness by temperature band
Heave protection keeps the ground warm. Insulation keeps the freezer cold without burning power to do it. The two are separate layers and both are needed. Floor insulation is almost always extruded polystyrene (XPS) or PIR board rather than the sandwich panels used on walls, because the floor has to carry racking and forklift loads — look for a compressive strength of at least 300 kPa for wheeled traffic. Thickness follows the same logic as wall panels, adjusted upward because the floor sees the ground rather than the air:
| Room temperature | Typical floor insulation | Heave protection |
|---|---|---|
| 0 to +5 °C (chiller) | 80 to 100 mm | Not usually required |
| −18 °C (freezer) | 150 mm | Required |
| −25 to −30 °C | 150 to 200 mm | Required, heating or forced ventilation |
| −40 °C and below | 200 mm or more, two staggered layers | Required, active heating |
These bands line up with the wall and ceiling panel thicknesses in our cold room panel thickness guide. If the walls are specified for −25 °C, the floor should not be specified as if the room were a chiller. A common cost-cutting mistake is to thin the floor because “nobody sees it” — it is the layer that costs the most to fix later.
The build-up, from the ground up
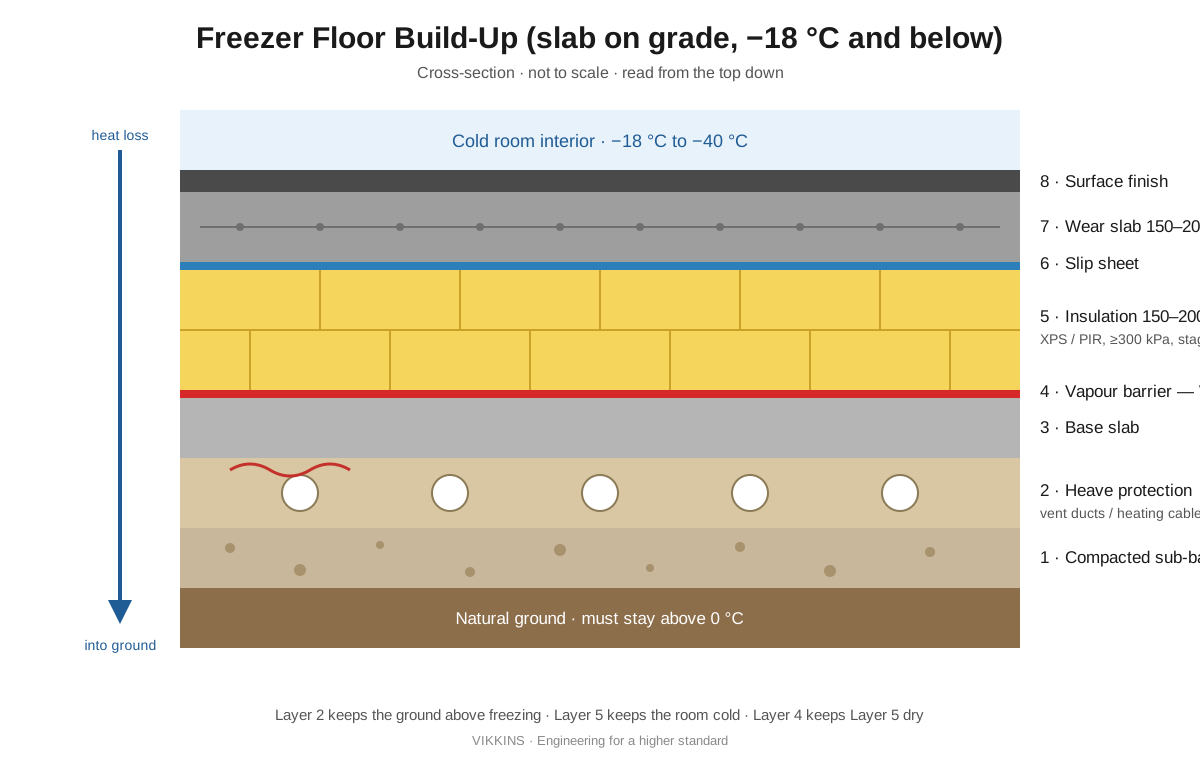
The order of layers matters as much as their thickness. This is the sequence for a slab-on-grade freezer floor:
- Compacted sub-base — well-drained granular fill, not the native clay.
- Heave protection — ventilation ducts, heating cable or glycol loop.
- Base slab — structural concrete, level to tight tolerance.
- Vapour barrier — on the warm side of the insulation, sealed at every lap and penetration.
- Insulation — XPS or PIR, joints staggered, two layers for thick specs.
- Slip sheet — polythene, so the wear slab can move independently.
- Wear slab — 150 to 200 mm reinforced concrete, isolated from walls and columns.
- Surface — power-float, epoxy or urethane depending on hygiene requirements.
Layer four is the one most often placed on the wrong side. The vapour barrier must face the warm ground, not the cold room. Put it above the insulation and vapour from the soil migrates into the board, condenses, freezes and the floor slowly turns into a block of wet, useless insulation. It is a one-day mistake with a ten-year consequence.
Sizing the floor into the whole room
The floor is not a separate decision from the rest of the room. A thicker floor changes the internal height, the door threshold detail and the cooling load calculation. If you are still at the stage of working out capacity and refrigeration duty, start with our cold room sizing guide and treat the floor spec as one of the outputs. For panel options, floor boards and the door and refrigeration components that go with them, see the Cold Room System range.
Frequently asked questions
Does a chiller at +2 °C need frost heave protection?
Normally not. The ground under a chiller stays above freezing. The exception is a chiller built next to a freezer sharing the same slab — then the freezer’s cold zone can extend under the chiller floor, and the protection has to cover both.
Can frost heave be fixed without removing the floor?
Rarely. Once the subsoil has frozen and lifted, the slab is already deformed. Heating the ground will let it settle, but not evenly, and the cracked wear slab and wet insulation stay. In almost every case the economic answer is to strip and rebuild, which is why the original build-up matters so much.
Which heave protection is best for a hot, humid site?
A ventilated sub-floor is usually the right first choice: the outside air is warm year-round, so a passive system provides free heat, and it has no running cost or cable to fail. Pair it with a robust vapour barrier — high humidity means strong vapour drive from the ground into the insulation.
How thick should the floor insulation be for a −18 °C freezer?
150 mm of XPS or PIR is the usual specification, with a compressive strength of 300 kPa or more if forklifts will run on it. Go to 200 mm for −25 °C and below, laid in two staggered layers so the joints do not line up.
WRITTEN BY
The VIKKINS Engineering Team
VIKKINS is a Canada-operated, China-manufacturing steel building company. Our engineers design and deliver turnkey steel structures and cold-chain systems to more than 90 countries from two production bases in Cangzhou (Hebei) and Harbin (Heilongjiang), coordinated through our Montréal office. We hold ISO 9001, ISO 14001 and ISO 45001 certification, CE and CWB welding qualifications, and a Level II steel-structure contracting qualification, with an annual capacity of 20,000 tonnes of steel and 5 million m² of insulated panels. These articles are written from real project experience and reviewed by our engineering team.
Tell us your project dimensions and use — we’ll send a preliminary design and quote within 24 hours. Service in English, Spanish, or French.